HTML for Writers
HTML is the backbone of the web. Every website is built on HTML (the content and page structure) and CSS (the style and presentation of the page) and additions such as JavaScript or PHP. Any journalist or blogger who writes for the web should understand a bit about how it works.
HTML basics
HTML is a “markup” language, which means it marks up your text, images and other content. Here are a few basics that can be used in a plain text document like TextEdit or WordPress’ Text editor page and other CMS systems like Movable Type or Tumblr.
All HTML elements comes in a tag that surrounds or includes content, using angle brackets: < >
Most use an opening <> and a closing </>, with a forward slash to show that the tag is over.
Six basic tags
1. The <p> element: creates a paragraph or block of plain text in HTML:
<p>The “p” tag surrounds text that would go in a paragraph or block of text.</p>
<p>So here’s a new line, surrounded by “p” tags.</p>
Which looks like this:
The “p” tag surrounds text that would go in a paragraph or block of text.
So here’s a new line, surrounded by “p” tags.
WordPress generates <p> tags automatically. Unlike other elements and tags, they will not appear around text in the Text editor, and do not need to be manually added.
2. The <br> element: To create a line break instead of a full paragraph break, use the <br> tag, no closing tag needed.
A line with a <br>break
A line with a
break
A line with a <p>p tag</p>
A line with a
p tag
Makes sense?
3. The <a> tag: creates a link to a webpage or other location.
<a href="https://www.rawkblog.com">Rawkblog</a>
And displays like this:
“A” stands for “anchor,” “href” means “hyperlink reference.” The full HTML statement says, anchor this link to this text (or image). To create more information in the link for readers and Google, you can add an anchor title. Don’t forget the quotation marks.
<a href="https://www.rawkblog.com" title="Rawkblog">Rawkblog</a>
4. The <img> tag: is how to display a .jpg, .png or other image file:
<img src="https://www.rawkblog.com/content/uploads/2016/08/frank-ocean-1018.jpg">This HTML equals:

No closing tag. img = image, src = source. Like an a tag, you can and should add information about what you’re pointing toward. Use an “alt” tag to help with screen readers and other accessibility tools.
<img src="https://www.rawkblog.com/content/uploads/2016/08/frank-ocean-1018.jpg" alt="Frank Ocean">
You can also control image size by setting the width and/or height in pixels or by percent:
<img width="300px" src="https://www.rawkblog.com/content/uploads/2016/08/frank-ocean-1018.jpg" alt="Frank Ocean">
5. The <b> tag:
To make text <strong>bold, you use this tag</strong>.
To make text bold, you use this tag.
6. The <em> tag:
To italicize text, <em>you use this tag</em>.
To italicize text, you use this tag.
Where to use this code
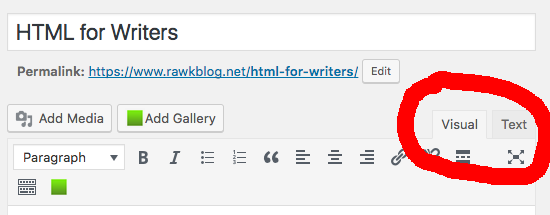
WordPress has two “content” editors — the “Text” editor and the “Visual,” or WYSIWYG (what you see is what you get) editor. The Text editor shows you the content with HTML markup in tag form, the Visual editor shows you the results of the HTML markup applied, or how it will look once it has been published. If you use the “B” button to bold a text in the Visual editor, you are actually just adding <strong></strong> tags behind the scenes. If you toggle over to the Text editor, you’ll see the addition.
Writing HTML directly into the Visual editor will not work. It will display as tags instead of functional code. Quotation marks need to be dumb (straight) quotes, not smart (curly) quotes for HTML. Writing in a text editor should solve this problem automatically—don’t write HTML code in Microsoft Word.
Paragraphs and line breaks
The WordPress Visual editor will automatically create a <p> tag when you press enter or the paragraph button in the menu. To create a line break instead (a <br>), press shift+enter.
In the Text editor, press enter once for a line break and twice to create a paragraph break. This will be visually obvious. Remember that WordPress automatically generates <p> tags and they won’t appear in the Text editor.
Occasionally, toggling going back and forth will erase some HTML when you are dealing with a funny video embed code or something like that. I personally write everything in the Text editor for clarity and to avoid code being accidentally eaten, but working in the Visual editor and occasionally switching to add HTML is also fine. Just make sure HTML tags go in the Text screen, and use WordPress’ Preview button to make sure everything looks right in the final post or page, which will look a little different than the Visual editor version.