Learn Sass: Just the Easy Stuff
I love writing CSS. I didn’t think I needed Sass, an “extension language” full of funny stuff like math and mixins. I ignored it for years: after all, vanilla CSS is endless, and I’m still catching up on Flexbox. But one thing lead to another and I’m here to tell you Sass is easy, helpful, and just about essential. You can get started writing better code with it in 10 minutes—I did! Let’s jump right in.
Getting Started
Sass has two syntaxes: we’re going to use “Sassy CSS,” which is identical to CSS, just with more good stuff. Sass files end with the extension .scss instead of .css. As such, they can’t be read by web browsers: you’ll need to compile your Sass code into a standard .css stylesheet. You can do that with the command line manually every time or automate it with a Grunt-y task-runner workflow, but if you’re not that advanced, you can do what I did: download the open-source Koala app to take care of it for you.
Setting Up Koala
After installing Koala, pick a project to work on. Make a new folder for Sass files and copy your old style.css over to it. Rename the file to the proper extension—style.scss—or just start a new file to work on. This new folder is in charge of our CSS from now on, and we’ll use it to generate a new style.css file.
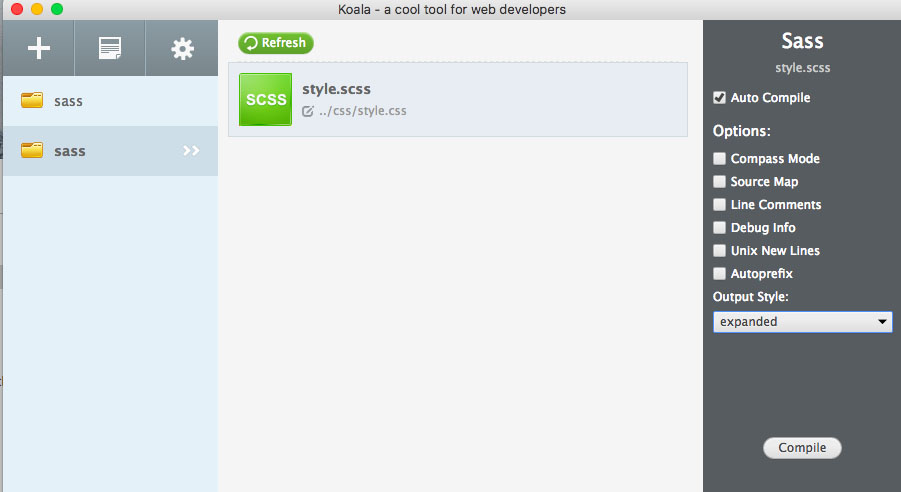
Drag the Sass folder into Koala and you’re almost ready. In the settings, check “auto compile” (to generate a new .css file every time you can make a change, magic!) and choose “nested” or “expanded” (standard CSS with no extra indentations) as your output style. You can use “compressed” if you want Koala to minify your CSS for production.
Not a Sass trick, just a bonus: you can set up the Autoprefixer here if you don’t have it running elsewhere. I’m running it as a package in my text editor, Atom.
Right-click the file in the main Sass window to set the “output path”: this is where you want your compiled stylesheet.css file to land so the rest of your project can read it.
(If you don’t want to accidentally overwrite a stylesheet in a current project with anything funky, now would be a good time to save a copy or use your version control.)
Organization
Sass can compile multiple .scss files into a single .css stylesheet. These are called partials and the files begin with an underscore.
Let’s say you want to add a CSS reset like normalize.css to your final stylesheet. You could add it as a partial as _normalize.scss in your Sass folder. (Remember, ordinary CSS works perfectly in an SCSS file: you can drop in Normalize.css by simply renaming it.)
In your stylesheet.scss, you can call it up with the @import command, like this:
/* Some CSS */

@import "normalize";

/* Everything from normalize.scss will show up right
* here in your final stylesheet.css, go look! */

/* More CSS */
Sass uses standard CSS multi-line comments like /* this comment */ but it also adds PHP-style single-line comments with a double-forward-slash.
body {
  font-size: 16px; // Those comments look like this
}

// Aren't they easy to use?
Standard CSS comments will carry over from Sass to CSS but single-line comments will be stripped out, which is nice. (There shouldn’t be any comments on your public, client-side CSS.) It’s a small improvement, but good to know as you document your work.
Let’s try some real code.
Nesting
This is what made me want to use Sass. In regular, slightly annoying CSS, you have to write code like this:
p {
  line-height: 1.4;
  margin-bottom: 1rem;
}

p a {
  text-decoration: underline;
  color: red;
}
But in Sass, you can nest these two and write shorter, more understandable code that mirrors HTML hierarchy:
p {
  line-height: 1.4;
  margin-bottom: 1rem;

    a {
      text-decoration: underline;
      color: red;
  }
}

// This code will compile to the code in the first example
Don’t forget the closing brackets.
Let’s say you wanted to set all the text elements for an article:
.content { }
.content p { }
.content h1 { }
.content h2 { }
.content h3 { }
In Sass, you can write that as:
.content {
  p { }
  h1 { }
  h2 { }
  h3 { }
}
Or you could write this:
// Sass!

.content {
  p {
    font-size: 16px;
  }

  h1, h2 {
    font-size: 20px;
  }
}
Which gives you:
/* CSS output */

.content p {
    font-size: 16px;
  }

.content h1, .content h2 {
    font-size: 20px;
  }
Amazing, right?
And you can keep nesting as deep as you like:
.content {
  p {
    a { }
  }
}
Watch out: It's almost too easy with Sass to nest a few levels deep, but keep in mind that over-qualified selectors perform poorly and make your code less modular. Don't use
.content p awhen you could use.content a(or justa)
Parent Selectors
You can also use the & symbol in nesting to attach the parent to a pseudo-element or class, like this:
/* Boring CSS */

a {
  text-decoration: underline;
}

a:hover {
  text-decoration: none;
}
// Exciting Sass
a {
text-decoration: underline;
&:hover {
text-decoration: none;
}
}You can also use & in a compound selector, a helping hand for grouping BEM-style code. Here's how the Sass official documentation explains it:
#main {
  color: black;
  &-sidebar { border: 1px solid; }
}
...compiles out to:
#main {
  color: black; }

#main-sidebar {
    border: 1px solid; }
Nesting Media Queries
Sass nesting allows you to attach media queries directly to selectors, rather than the other way around:
/* CSS */
body {
  font-size: 1em;
}

@media screen and (min-width: 800px) {
  body {
    font-size: 1.125em; /* 18px */
  }
}

@media screen and (min-width: 1000px) {
  body {
    font-size: 1.25em;
  }
}
...can be written in Sass as:
// Sass
body {
  font-size: 1em;

  @media screen and (min-width: 800px) {
    font-size: 1.125em;
  }

  @media screen and (min-width: 1000px) {
    font-size: 1.25em;
  }
}
You can also nest media queries one inside the other to combine them.
If this is all you did in Sass, it would be worth the switch. But this is just scratching the surface. Let me show you one more thing.
Variables
Variables are actually ready in vanilla CSS now, but don't have across-the-board browser compatibility. Sass is a safer and absurdly powerful option.
As they do in other programming languages, variables begin with a dollar sign. In Sass, they're written as a typical property-value pair.
$main-color: #ff0000; // redOnce you've defined a variable, you can use it wherever you want in your code—and update all the uses from a single place if you change a color or update a font-family. If you build your own framework or a WordPress starter theme (which I'm readying now) and make these sorts of updates regularly, this is kind of a game-changer.
$main-color: #ff0000; // red

.button {
  background-color: $main-color;
}

a {
  color: $main-color;
}
Variables use hypens (-) and underscores (_) interchangeably.
There's much more, including mixins (which store groups of selectors for repeated use), math, the @extend rule, Sass frameworks like Compass, and so on. But I promised you the easy stuff: I hope this is enough to get started and dive right in, as I am myself. Now, to refactor all my WordPress CSS...
Visit the Sass homepage below for more tips and tutorials.
Read More
Sass-lang.com official guide (starter page)
The official Sass reference